
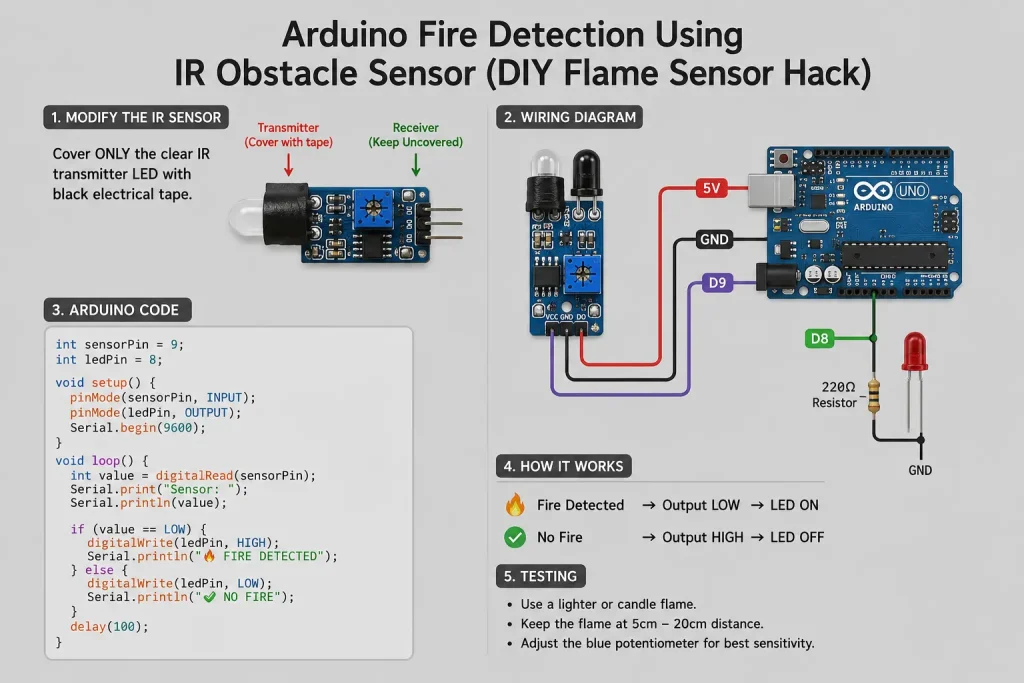
Arduino Fire Detection Using IR Obstacle Sensor. Have you ever started an Arduino fire alarm project only to realize you don’t have a dedicated flame sensor module? Instead of stopping your project or waiting days for delivery, you can actually convert a common IR obstacle avoidance sensor into a basic flame detector.
This simple DIY electronics project is perfect for beginners learning Arduino, robotics, IoT, and sensor-based automation.
🔥 How Does It Work? Arduino Fire Detection Using IR Obstacle Sensor
An IR obstacle sensor normally works by:
- Sending infrared light from the clear IR transmitter LED
- Receiving reflected IR light using the black IR receiver
But for flame detection, we can disable the transmitter and use only the receiver.
A flame naturally emits infrared radiation, and the black IR receiver can detect this.
Components Required
- Arduino UNO / Nano
- IR Obstacle Avoidance Sensor
- LED
- 220Ω Resistor
- Breadboard
- Jumper Wires
- Black Electrical Tape
- USB Cable
Step 1 — Modify the IR Sensor
Locate the two LED-like components:
- Clear LED → IR transmitter
- Black LED → IR receiver
Important:
Cover ONLY the clear IR transmitter LED using black electrical tape.
Do NOT cover the black receiver.
This converts the module from active obstacle detection into passive flame detection mode.
Step 2 — Arduino Wiring
IR Sensor Connections
| IR Sensor | Arduino |
|---|---|
| VCC | 5V |
| GND | GND |
| DO | D9 |
LED Connections
| LED | Arduino |
|---|---|
| LED + | D8 |
| LED – | 220Ω Resistor → GND |
Step 3 — Arduino Code
int sensorPin = 9;
int ledPin = 8;

void setup() {

  pinMode(sensorPin, INPUT);
  pinMode(ledPin, OUTPUT);

  Serial.begin(9600);
}

void loop() {

  int value = digitalRead(sensorPin);

  Serial.print("Sensor: ");
  Serial.println(value);

  // FIRE DETECTED
  if(value == LOW) {

    digitalWrite(ledPin, HIGH);

    Serial.println("🔥 FIRE DETECTED");

  }

  // NO FIRE
  else {

    digitalWrite(ledPin, LOW);

    Serial.println("✅ NO FIRE");

  }

  delay(100);
}
Step 4 — Testing the Flame Detection
Use:
- Lighter
- Candle
- Small flame source
Recommended distance:
5cm – 20cm
If detection is weak:
Rotate the blue potentiometer on the IR sensor slowly until sensitivity improves.
How It Works
No Fire
- Sensor output = HIGH
- LED OFF
Fire Detected
- Sensor output = LOW
- LED ON
Important Notes
This project works well for:
✅ Arduino beginners
✅ DIY robotics
✅ Basic fire alarm demo
✅ Electronics learning
✅ IoT experiments
However, it is NOT recommended for:
❌ Industrial fire protection
❌ Safety-critical systems
❌ Real security alarm installations
Dedicated flame sensors are always more accurate and reliable.
Final Thoughts
This is one of the coolest low-cost Arduino sensor hacks because it lets you reuse a very common IR obstacle sensor module for fire detection projects.
Perfect for students, robotics workshops, and electronics hobbyists in Bangladesh learning Arduino and IoT systems.
Arduino fire sensor project, IR obstacle sensor flame detection, DIY flame sensor Arduino, Arduino fire alarm project, robotics project Bangla, Arduino Bangladesh, DIY electronics Bangla, IR sensor Arduino tutorial, flame detection Arduino UNO, Arduino IoT project
#arduino #robotics #iot #electronics #diyelectronics #arduinoproject #firesensor #irsensor #bangladesh #bangla
FREE ROBOTICS COURSE